③GAS(GoogleAppsScript)とCOTOHA APIを使い「会話するLINEチャットボット」を作ってみる【COTOHA APIで感情分析別に分けてみる】
LINE Messaging APIとGoogleAppsScriptとCOTOHA APIで「会話するLINEチャットボット」を作ってみました。
記事構成 ①オウム返しボットを作る ②COTOHA APIでテキストをタイプ別に分けてみる ③COTOHA APIでテキストから感情を判別してみる←イマココ ④文タイプ別に返信するチャットボットを作る
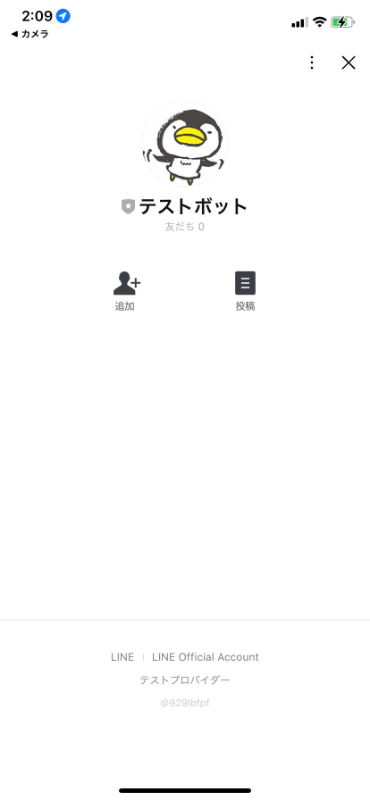
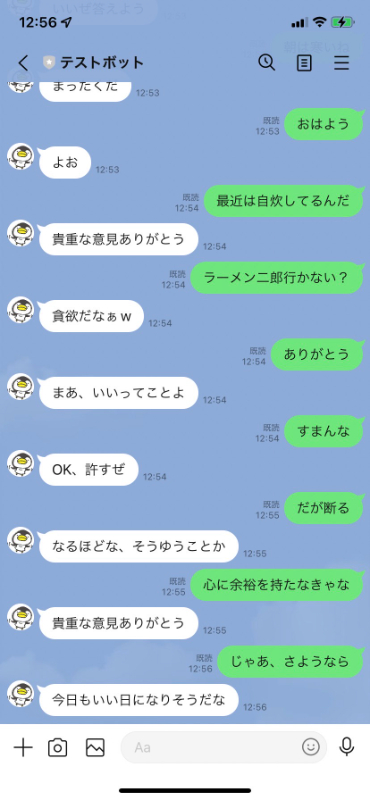
完成画像↓
COTOHA APIで「感情分析」してみる!
詳細はコチラ COTOHA API 感情分析
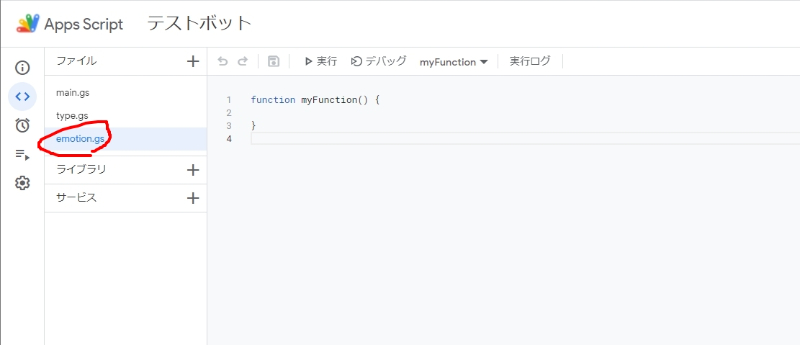
新しいファイルを作りましょう(emotion.gs)
// emotion.gs
//受信したメッセージをCOTOHA APIに送り、感情タイプの判定の結果を取得する関数
function getSentimentType(AccessToken, message){
const url = "Developer API Base URL/nlp/v1/sentiment"; //Developer API Base URLをセットする
const headers = {
"Authorization": "Bearer " + AccessToken,
"Content-Type": "application/json; charset=UTF-8",
}
const data = {
"sentence": message,
}
const options = {
"method": "post",
"payload": JSON.stringify(data),
"headers": headers
}
const responce = UrlFetchApp.fetch(url, options);
const json = JSON.parse(responce.getContentText());
const sentiment = json["result"]["sentiment"];
const emotion = json["result"]["emotional_phrase"][0]['emotion'];
const type_data = {
sentiment: sentiment,
emotion: emotion
};
return type_data;
}
//感情タイプから返信メッセージを選択する関数
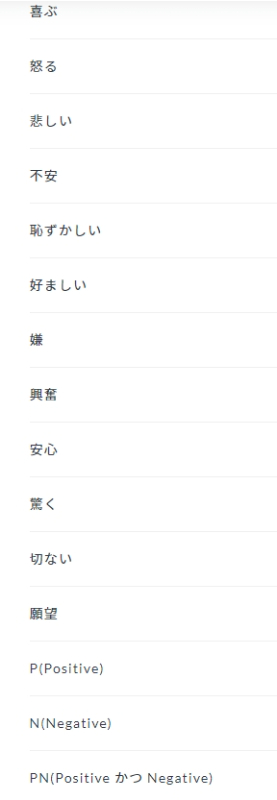
function emotionChoiceReply(modality, emotion) {
if (emotion == '喜ぶ') {
return '喜ぶ';
} else if (emotion == '怒る') {
return '怒る';
} else if (emotion == '悲しい') {
return '悲しい';
} else if (emotion == '不安') {
return '不安';
} else if (emotion == '恥ずかしい') {
return '恥ずかしい';
} else if (emotion == '好ましい') {
return '好ましい';
} else if (emotion == '嫌') {
return '嫌';
} else if (emotion == '興奮') {
return '興奮';
} else if (emotion == '安心') {
return '安心';
} else if (emotion == '驚く') {
return '驚く';
} else if (emotion == '切ない') {
return '切ない';
} else if (emotion == '願望') {
return '願望';
} else if (emotion == 'P') {
return 'ポジティブ';
} else if (emotion == 'N') {
return 'ネガテイブ';
} else if (emotion == 'PN') {
return 'ポジネガ';
//それ以外の感情タイプのメッセージを受信した場合の返信
} else {
return 'ちょっと何言ってるかわかんない';
}
}
解説
Developer API Base URLを設定する。
↓ここにDeveloper API Base URLをセット。
const url = "Developer API Base URL/nlp/v1/sentiment";
下のemotionChoiceReply関数はCOTOHA APIの感情判定によって返信を分岐しています。
↓main.gs
// main.gs
//LINE Developersで取得したアクセストークンを入れる
const CHANNEL_ACCESS_TOKEN = 'LINEのチャネルアクセストークンをセット';
const line_endpoint = 'https://api.line.me/v2/bot/message/reply';

//メッセーを受送信する関数
function doPost(e) {
  const json = JSON.parse(e.postData.contents);

  //返信するためのトークン取得
  const reply_token= json.events[0].replyToken;
    if (typeof reply_token === 'undefined') {
    return;
  }

  //送られたメッセージ内容を取得
  const message = json.events[0].message.text;

  //COTOHA APIのアクセストークンを取得
  const AccessToken = getAccessToken();

  //COTOHA APIでメッセージの文タイプを判定
  // const message_type = getSentenceType(AccessToken, message);
  const message_type = getSentimentType(AccessToken, message);

  // 返信するメッセージを選択する処理
  // const reply_messages = typeChoiceReply(message_type.modality, message_type.dialog_act);
  const reply_messages = emotionChoiceReply(message_type.sentiment, message_type.emotion);

  // メッセージを返信する
  const messages = [{'type': 'text', 'text': reply_messages }];

  UrlFetchApp.fetch(line_endpoint, {
  'headers': {
      'Content-Type': 'application/json; charset=UTF-8',
      'Authorization': 'Bearer ' + CHANNEL_ACCESS_TOKEN,
  },
  'method': 'post',
  'payload': JSON.stringify({
      'replyToken': reply_token,
      'messages': messages,
  }),
  });
  return ContentService.createTextOutput(JSON.stringify({'content': 'post ok'})).setMimeType(ContentService.MimeType.JSON);
}

//COTOHA APIのアクセストークンを取得する
function getAccessToken(){
  const url = "https://api.ce-cotoha.com/v1/oauth/accesstokens";

  const headers = {
    "Accept": "application/json",
    "Content-type": "application/json"
  }

  const data = {
    "grantType":"client_credentials",
    "clientId":"Developer Client idをセット",
    "clientSecret":"Developer Client secretをセット"
  }

  const options = {
    "method": "post",
    "payload": JSON.stringify(data),
    "headers": headers
  };

  const responce = UrlFetchApp.fetch(url, options);
  const json = JSON.parse(responce.getContentText());

  return json["access_token"];
}
解説
この部分で関数を書き分けることで②で作った「文判定」から「感情判定」に切り替えています。 「文判定」の関数の方はコメントアウトしておきます。
  //COTOHA APIのアクセストークンを取得
  const AccessToken = getAccessToken();

  //COTOHA APIでメッセージの文タイプを判定
  // const message_type = getSentenceType(AccessToken, message);
  const message_type = getSentimentType(AccessToken, message);

  // 返信するメッセージを選択する処理
  // const reply_messages = typeChoiceReply(message_type.modality, message_type.dialog_act);
  const reply_messages = emotionChoiceReply(message_type.sentiment, message_type.emotion);
再度デプロイ
ファイルができましたら②のやり方で再度デプロイします。(保存を忘れずに!)
どうでしょうか?
感情タイプを返信してくるLINEチャットボットになりましたでしょうか?
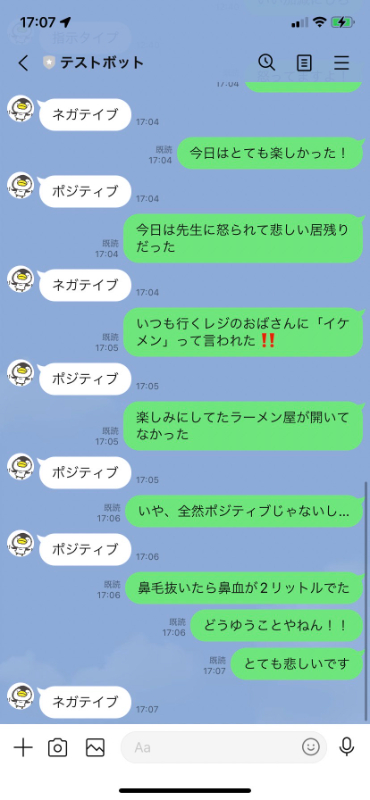
だいぶ雑ですねw こんなに種類があるのにほとんど返してくるのは「ポジ」「ネガ」「ポジネガ」だけです・・・。 COTOHA API 感情分析
この他にもネガティブ・ポジティブを数値で表現するパラメータもありますが、そこだけでセリフを考えるのは大変そうですし、中には判別できずに?返信が帰ってこない時もあります。
2つを混ぜて実装するもの面白いと思いましたが、今回はシンプルに文タイプのみで返信を考えてみようと思います。
おまけ
GASでconsole.logのかわりにスプレットシートに直接ログを吐いてデバッグしたりしてましたw
function log_test(text) {
  const ss = SpreadsheetApp.getActiveSpreadsheet()
  const sheet = ss.getActiveSheet()
  sheet.getRange("A1").setValue(text)
}
  const message_type = getSentimentType(AccessToken, message);
  log_test(message_type)
記事構成 ①オウム返しボットを作る ②COTOHA APIでテキストをタイプ別に分けてみる ③COTOHA APIでテキストから感情を判別してみる←イマココ ④文タイプ別に返信するチャットボットを作る←次