アプリ開発を楽しむ【#18:投稿詳細ページをつくる】React+Redux+TypeScript
前回までの記事 アプリ開発を楽しむ【#1:アプリの概要】 アプリ開発を楽しむ【#2:環境構築1(React+TypeScript)】 アプリ開発を楽しむ【#3:環境構築2 (ESLint+Prettier)】 アプリ開発を楽しむ【#4:ヘッダー】 アプリ開発を楽しむ【#5:MyTogoList】 アプリ開発を楽しむ【#6:Reduxで状態管理1】 アプリ開発を楽しむ【#7:Reduxで状態管理2】 アプリ開発を楽しむ【#8:Google Map API】 アプリ開発を楽しむ【#9:新規追加モーダルUI(togo)】 アプリ開発を楽しむ【#10:Google Mapから座標を取得】 アプリ開発を楽しむ【#11:Togoの追加】 アプリ開発を楽しむ【#12:Togoの編集1】 アプリ開発を楽しむ【#13:Togoの編集2】 アプリ開発を楽しむ【#14:カスタムフック】 アプリ開発を楽しむ【#15:ルーティングの設定】 アプリ開発を楽しむ【#16:Mapページをつくる】 アプリ開発を楽しむ【#17:投稿一覧ページ他をつくる】
今回は、投稿詳細ページをつくっていきたいと思います。
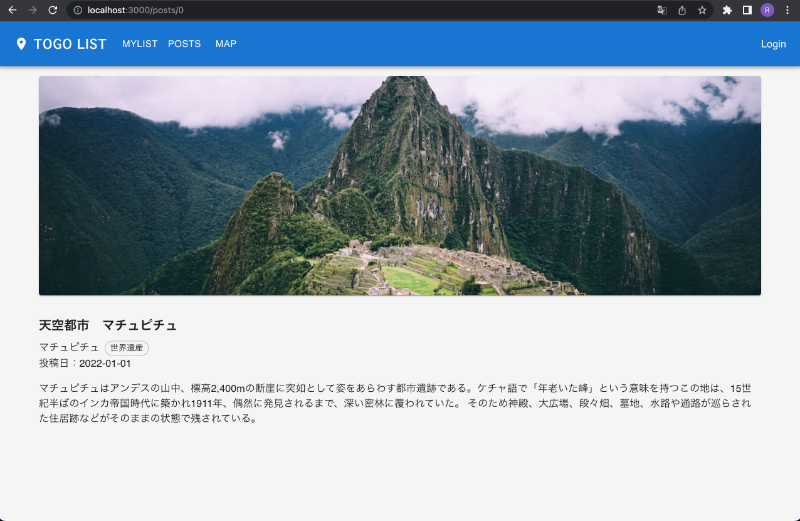
完成イメージは次のとおりです。
今回やること
- PostDetailコンポーネントの作成
- OnePostページにPostDetailを表示
1.PostDetailコンポーネントの作成
frontend/app/src/components/post/PostDetail.tsxを次のようにつくります。
import React, { useEffect } from 'react';
import { Box, Chip, Paper, Grid, Typography } from '@mui/material';
import { useDispatch, useSelector } from 'react-redux';
import { getPostList, initialState } from '../../redux/postSlice';
import { RootState } from '../../redux/store';
import Error from '../Error';
import samplePostList from '../../sampleData/posts';

interface PostDetail {
  togoId: number;
}

const PostDetail: React.FC<PostDetail> = ({ togoId }) => {
  const dispatch = useDispatch();
  const { postList } = useSelector((state: RootState) => state.post || initialState);

  useEffect(() => {
    dispatch(getPostList(samplePostList));
  }, [dispatch]);

  const post = postList.filter((item) => item.togo.id === togoId);

  if (!post.length) {
    return <Error />;
  }

  return (
    <>
      <Paper
        sx={{
          position: 'relative',
          backgroundColor: 'grey.300',
          color: '#fff',
          mb: 4,
          backgroundSize: 'cover',
          backgroundRepeat: 'no-repeat',
          backgroundPosition: 'center',
          backgroundImage: `url(${
            post[0].image ? post[0].image : 'https://source.unsplash.com/random'
          })`,
        }}
      >
        <Box
          sx={{
            position: 'absolute',
            top: 0,
            bottom: 0,
            right: 0,
            left: 0,
          }}
        />
        <Grid container>
          <Grid item md={6}>
            <Box
              sx={{
                position: 'relative',
                height: { xs: '250px', md: '350px' },
              }}
            />
          </Grid>
        </Grid>
      </Paper>
      <Typography variant="h6" gutterBottom sx={{ fontWeight: 'bold' }}>
        {post[0].title}
      </Typography>
      <Box component="div" sx={{ display: 'inline' }}>
        {post[0].togo.location}
      </Box>
      <Box component="div" sx={{ display: 'inline', ml: 1 }}>
        <Chip label={post[0].togo.tag} variant="outlined" size="small" />
      </Box>
      <Box component="div" sx={{ display: 'flex' }}>
        投稿日:{post[0].publishedAt}
      </Box>
      <Box component="div" sx={{ mt: 2 }}>
        {post[0].description}
      </Box>
    </>
  );
};

export default PostDetail;
受け取ったpropsのtogoidを元にStoreのpostListから該当のpostを表示させています。
2.OnePostページにPostDetailを表示
import { Container } from '@mui/material';
import { useParams } from 'react-router-dom';
import PostDetail from './post/PostDetail';

const OnePost = () => {
  const { id } = useParams();

  return (
    <Container maxWidth="lg" sx={{ pt: 2 }}>
      <PostDetail togoId={Number(id)} />
    </Container>
  );
};

export default OnePost;
useParamsを使うとURLからidを取得できるようになります。 App.tsxで設定している下記の部分で「:id」としているのでconst { id } = useParams()で取得できます。
<Route path="/posts/:id" element={<OnePost />} />
もし、App.tsxで次のように書いていたら、const { post_id } = useParams()で取得ができます。
<Route path="/posts/:post_id" element={<OnePost />} />
そして、URLから取得したidをPostDetailコンポーネントにpropsとして渡しています。
今回は以上となります。 これで、投稿一覧から投稿詳細ページへ、Mapページのマーカーから投稿詳細ページにページ遷移できるようになりました。
コードはGitHubに置いてありますのでよければ参考にしてください。 mainブランチは常に最新のものになります。 今回の内容はblog_18のブランチを参照してください。 https://github.com/KINE-M/togo_app